
Cake Pops That Actually Taste as Good as They Look
The cake pops are always the first dessert to catch everyone’s eye at any dessert table because of its circular form, chocolate covering and various decorations. Cake pops can be found at birthday parties, weddings, baby showers, and even given out as a thank you gift.
They are not difficult to prepare at home. A basic cake pop recipe can still turn out well as long as you take care about the coating, the shaping, and the tools you use. If you know how to do the basics from the start, the whole thing will become much easier.
A good choice would be buying quality cake pop sticks because they will hold your pops without any trouble while you dip, decorate and serve them, thus saving you from a lot of trouble.

What Are Cake Pops?
Cake pops are a lot simpler than they appear if you’ve never made them before; you make them by crumbling the cake, mixing it with the frosting, rolling it into small cake balls, putting them on sticks and then covering them with chocolate or candy melts.
The outer layer keeps the cake soft inside and at the same time gives each pop a smooth finish. When it has set, the cake is ready for sprinkles, a drizzle, or other edible decorations to go with your celebration.
A major reason why cake pops are so popular is that they are easy to customise. Whether you want to alter the flavour, the colours, or the decorations to match birthdays, weddings, baby showers, or almost any other special occasion, you can do so by using the same basic method.

The Moulds That Make Shaping Easier
You will likely notice that some of the cake pops are larger than others after eating a few. This is why cake pop moulds can produce such consistency.
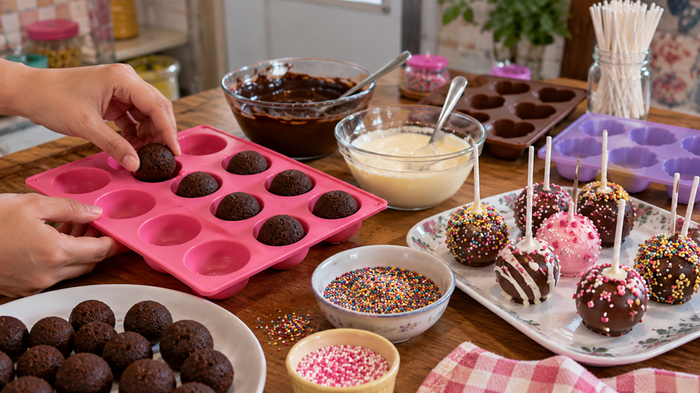
The silicone mould provided by the cake pops ensures that each cake pop has the same shape, which makes the coating appear more even after dipping. After they have been shaped, the cake pops are ready to be chilled without the necessity of adjusting them individually.
There are many other varieties worth trying besides the ordinary round cake pop; a Halloween cake pop silicone mould is a pleasant option for seasonal goodies, and the Geo Shock pop cakesicle silicone mould offers a contemporary shape with neat edges.
If you want to go for a shell-first approach, then the cake plate pop it mould and the special quilted pop cake chocolate mould are both good choices. You might also have a go at BWB pop, since it comes in shapes such as teddy bears, hearts, milkshakes, clouds, or ice creams for themed parties.
Whatever the occasion may be such as a birthday, a wedding, or a holiday party, you can find a cake pop silicone mould to go with it.
Choosing the Right Sticks
Although it may seem like a minor point, the stick does affect how well your cake pops stay together; if you’ve ever seen a cake pop slide down the stick when dipping there’s generally a reason for it.
It is awkward to hold short cake pop sticks and those that are very thin might have difficulty supporting the weight of the coated cake, so it is best to choose the correct size right from the start in order to make dipping and decorating much more comfortable.

PME lollipop sticks are widely used when making standard-sized cake pops, while shorter lollipop stick are suitable for use with smaller treats. Culpitt white cake pop sticks give a more seamless appearance when your cake pops have a white or pastel finish.
Before you insert the stick, first dip the tip into the melted candy melts and then allow it to set for approximately 10 minutes before pushing the stick into the cake balls. Taking this small step will help keep the stick in place and decrease the likelihood of the pop slipping when you are decorating.
Tips for the Coating
The cake balls have been rolled, chilled, and are now ready to dip; the next stage is what will determine how smoothly the final cake pops appear.
When learning how to make cake pops, do not dip them straight from the freezer; instead, place them in the fridge for a couple of hours first. If they are still too cold, the coating will crack as it begins to set.
The candy melts ought to be smooth and easy to stir; if they grow too thick during your processing, warm them gently and mix them well before dipping the next pop.
When dipping each cake pop, take your time and turn it gently as you are coating it. This will result in a smoother finish for the coating and will help to reduce the air bubbles.
When the cake pop has been coated, gently tap the sticks against the side of the bowl to get rid of any extra amount.
Decorating Your Cake Pops
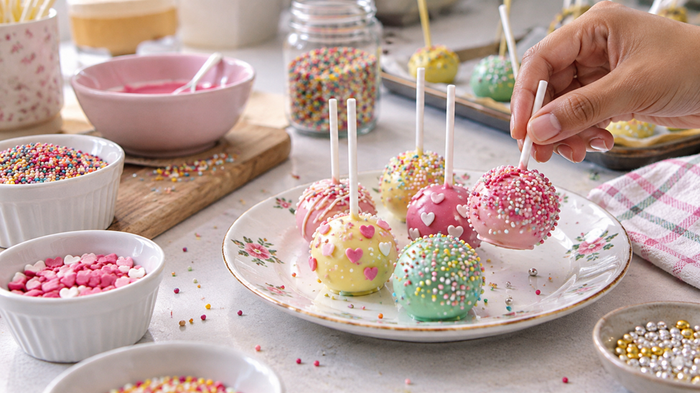
It is at this point that your cake pops begin to reflect the occasion for which they are being made. You have the possibility of giving your cake pops a different appearance without having to alter the entire design.
Add some edible sprinkles while the coating is still wet so that they stick well; you can choose the colours to match birthdays, weddings, baby showers, or seasonal celebrations and a small amount of sprinkle mix can give each cake pop a different appearance.
When the coating has hardened, pour on a second colour over it as a simple way to finish the job. Thin lines or small patterns are usually sufficient to provide additional detail.
You can likewise use edible decorations such as sugar flowers, pearls, stars, or pieces of shaped sugar. Press them onto the coating before it has fully set so that they remain in place.
There is no single correct method of decorating; you should combine different ideas so that each cake pop matches the celebration you’ve arranged.
Displaying and Gifting Cake Pops
A display is needed if you are to keep your cake pops standing and in good appearance. Before handling or putting them in packaging, make sure they have dried properly.
If you’re making them at home a simple block of Styrofoam works just fine, but for use at birthdays, weddings and at party tables a cake pop stand gives a neater display and at the same time keeps each cake pop in place while the coating is setting.
When giving them as gifts, put each one into a clear treat bag and tie the bag with a ribbon. Put the pops in a small gift box so that they remain secure when being transported and still appear neat when the box is opened.
If you want to include an extra element of surprise, put a pack of FunCakes popping candy into the gift box with your cake pops so that both children and adults have another delicious treat to enjoy. Little touches such as this can make your handmade gift seem even more thoughtful.
Storing and Making Ahead
It’s a good idea to plan in advance, particularly when you’re preparing cake pops for a party or a special event.

If you intend to add some sprinkles, then you should decorate the cake pops before storing them so that all the decorations remain firmly in place.
The cake balls can be prepared a day before decorating and then stored in the fridge for up to 24 hours; if you need more time, they can be kept in the freezer for up to two days before coating.
After you have dipped and decorated the cake pops, keep them in a covered container at room temperature for two to three days; if it is warm weather, then store them in a cool, dry place, away from direct sunlight, so that the coating remains in good condition.
It also helps to use baking equipment at every stage. Whether you’re shaping the cake, dipping it or decorating it, having the correct tools ensures that each batch is more consistent, particularly when you’re producing a large number of cake pops for guests or as gifts.
The Finish That Sets Them Apart
When your cake pops have been coated, decorated, and are ready to be served, it is usually the small finishing details that people notice first; a smooth coating, evenly shaped pops, and careful decorations all contribute to giving your batch a neat appearance.
When you want to add a final touch, a Sugar flower sprinkle mixes is a pleasant option for weddings, baby showers, spring events, or for setting up afternoon tea tables. The Blossom Pop sugar flower sprinkle mix provides gentle floral details without covering the entire pop.
No single style is suitable for all occasions; you can keep your cake pops simple by using just a few sprinkles or decorate them with flowers, pearls, and coloured toppings to go with your celebration.
If you put a bit of thought into it and have the proper tools, the cake pops will be so enjoyable to look at that people will appreciate them just as much when they’re eating them.
Comments are closed here.