
Want to Make a Teddy Bear Topper for a Birthday Cake?
Looking at a teddy bear cake topper and wondering how people make them look so cute?
To be honest, it is much easier and way more fun than it looks. Once you begin shaping the little ears, paws, and face, the whole thing starts coming together so nicely.
Whether you are making teddy cakes for a baby shower, or a birthday surprise, having the right sugarcraft supplies makes the process feel creative, relaxing, and genuinely enjoyable.
What Paste Should You Use?
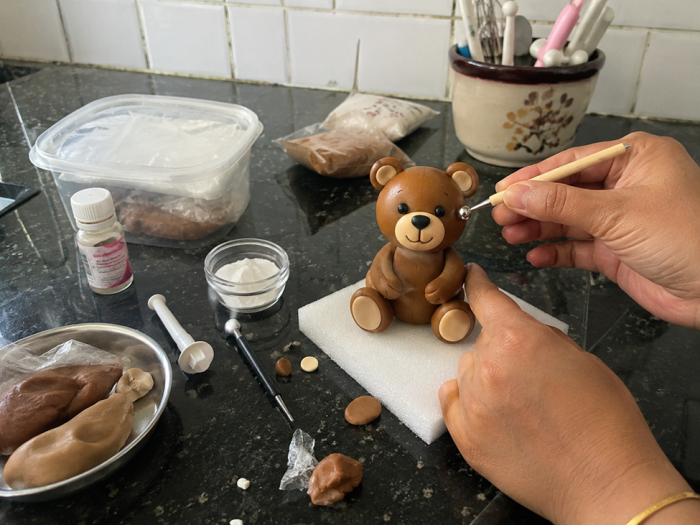
A well-made teddy bear cake topper usually starts with using a paste that is easy to work with. Making little paws, ears, and facial details feels more manageable and easy when the modelling paste is of good quality because it stays smooth and flexible in your hands.
- If you use regular sugarpaste, you will probably notice it drying out too quickly or cracking while you try to shape your bear
- For a proper fondant teddy bear cake topper, you want a paste that stays soft and flexible while you work, especially when you are blending little details together
- Brown teddy bear sugarpaste saves a lot of time because you do not need to sit there mixing colours again and again trying to get the same warm tone.
- If you are making teddy cakes for the first time, ready-to-roll brown sugarpaste usually feels much easier to handle while shaping little details
- While you work, keep extra paste sealed in a small bag because it can dry out fast once exposed to air.
What Tools Do You Actually Need?
When you first see people making a teddy bear for cake topper, it looks like they own an entire bakery cupboard full of tools. Then you actually start and realise you only use a few things most of the time.
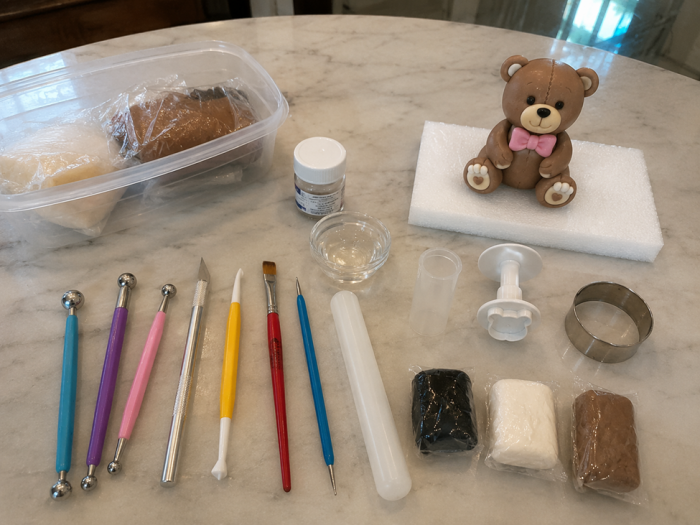
- A ball tool helps smooth joins and shape tiny facial details
- A foam pad stops the paste dragging while you work
- Edible glue helps little pieces stay attached properly
- Black and white paste work perfectly for the eyes and nose details
- A cocktail stick or thin skewer helps support the topper from inside
And if getting the shape right feels confusing at first, teddy bear cutters make things easier without needing perfect hand shaping. A few simple texture tools can make your fondant teddy bear look neater and more detailed without needing advanced shaping skills.
Need Simple Steps for a Teddy Bear Cake Topper?
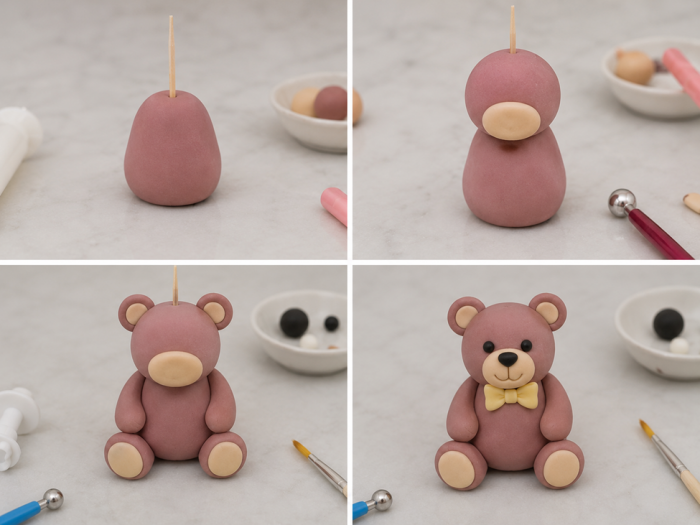
Step 1: The Body
- Start by rolling a ball of teddy bear brown paste slightly bigger than the body size you want
- Shape it gently into a soft oval, then flatten the front a little so your bear sits naturally instead of looking stiff
- Push a cocktail stick through the centre carefully to support the head and keep the structure stable once assembled
Step 2: The Head
- Roll another smooth ball from brown paste, slightly smaller than the body for balanced proportions
- Add a small oval of skintone or beige paste onto the lower half to create the muzzle area
- Blend the edges softly using your fingertip or a ball tool on a foam pad until everything looks smooth and seamless
Step 3: Ears, Arms and Legs
- Roll two tiny balls for the ears, flatten gently, and attach them using edible glue
- Use little beige circles in the ears to help the details show up more clearly.
- Shape the arms and legs using small sausage pieces, then round the ends slightly for soft little paws
- Bend each piece gently before attaching so your teddy looks more relaxed and natural
Step 4: The Face
- Once you start adding the face details, your Edible Teddy Bear Cake Topper suddenly starts feeling much more real and expressive.
- Use black paste for tiny eyes and a nose, pressing them in carefully with the ball tool
- Once you add the small smile, your teddy bear cake topper suddenly looks much more lively and adorable
Do not stress about making your teddy bear cake topper look perfect. The little handmade details are what make it feel cute and special. Once you finish your first bear, the next one will already feel much easier and more fun to create.
Want an Even Easier Option?
A bear head silicone mould can help speed things up when making smaller details for the face. The basic shape and facial structure come out much more even, which makes the topper look cleaner overall.
It works really well for making a cute teddy bear cake topper when you want neat face details without shaping every tiny piece yourself.
Getting the Topper to Stand Up
Sometimes the teddy bear sits perfectly fine in the beginning, then quietly starts leaning back a few minutes later.
Fresh paste stays soft for a while, so give the topper a few hours to firm up before placing it on the cake. Overnight works even better.
If the bear keeps leaning back, place a small rolled piece of spare paste behind it while it dries. That helps the topper stay in the position you actually want.
A Few Tips Before You Start
The first teddy bear usually teaches you more than any tutorial does. A few small habits make the whole process feel much less messy while learning how to make teddy bear cake topper figures:
- Work in a cooler room because warm hands soften the paste really quickly
- Use only a small amount of edible glue or the pieces start sliding everywhere
- Build the bear step by step instead of attaching everything at once
- Let the body firm up slightly before adding the head and smaller details
- Spend a little extra time on the face because the eyes and nose are always the first thing people notice on the topper
How Far Ahead Can You Make It?
One of the best things about making a fondant teddy bear topper is that you can prepare it days before the cake. Even a week earlier works fine.
Just let it dry in a cardboard box at room temperature. Avoid the fridge or sealed containers because moisture softens the topper.
By the time the cake is ready, the topper will be firm, light, and easy to place exactly where you want it.
Time to Make Your Teddy Bear
Your first teddy bear cake topper does not need to look perfect to look cute. Half the charm is in those tiny little handmade details anyway.
Start with the body, take your time with the face, and let each part firm up before adding the next one. Things get much easier after the first try.
And if the first bear comes out looking slightly sleepy or confused, honestly, that just gives it personality.
Comments are closed here.